Coffee Table Shopping

In our last home, we had two little multi-sided figures (I tried to find the math name but gave up) to place our coffee and remotes on.  They were cute, easy to move, and kid friendly. However, they have gone to live in other parts of our home, and so we are in the need of something new.

Right now, we are using a coffee table borrowed from our housemates. Using it for the last couple of months has made us realize how functional it is to have a large surface in front of your sofa.  Here is what we are curently working with.

Try to imagine the room with pretty greyish wood floor and paneling painted a lighter color.  Clearly, we have lots to do, but since it is a rainy day, and The O.C. is on Hulu, I thought compiling all of my favorite coffee tables here is as productive is as I am going to get. Plus, it helps to have them all in one place for when I show Taylor.

Here is what I was looking for in my browsing.

  • At least 4 feet long to fit the length of the sofa
  • Multiple tones or at least multiple finishes. The reason for this is because I love wood, but we have a leather sofa, so that's a lot of brown.  So I need some wood and some metal or marble.  No glass please!
  • Clean lines
  • I like all of my pieces to be stars, but nothing too flashy.
  • Also, cheap but well made

Here are my top picks:

1 | 2 | 3 | 4

5 | 6 | 7

What do you all think? Drawers or no drawers?   I think that storage is ideal, but then I can just see a bunch of junk piling up in there.  However, at least said junk is hidden.  I think my favorites are 4, 5, and 7.  5 is on super sale, but there are no reviews, so I have my concerns.

One of the other options for a coffee table is this bench from Overstock.  House Tweaking inspired me using this bench as a coffee table in their living room.

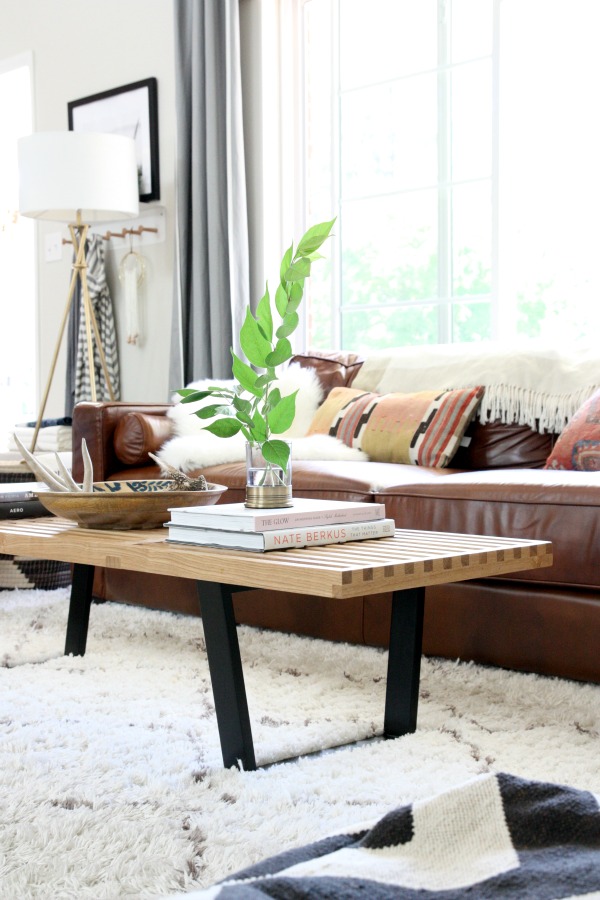
I would like to put together a mood board for the living room soon, and a coffee table and a rug are the only pieces that will be new to the space.  I made a decision last week, but I am curious for your thoughts.  Which one would you pick?

DIY: Tips and Tricks on Building Open Shelving for Your Home

Hi, friends!  I wanted to give you a glimpse into our living room today.  More specifically, our open shelving.  Open shelving always seems like something I hear about in relation to the kitchen regions, but we had seen this open shelving done in a friend's home and the price/ease of putting them together couldn't be beat!  Ikea sells these brackets for $2.00 a piece.  They originally come in black, but I spray painted them gold because I am a proud passenger on the gold-stuff-everywhere-bandwagon.  No shame.

I first used Illustrator to draw up a sketch of what I wanted them to look like.  I took into account the size of some of our art prints, a lamp, our television and where I would want to place them.  I loosely used the rule of thirds to start.


I originally planned on using the bracket above the boards, but that didn't pan out quite like I hoped.  The weird brown/grey box in the bottom left was originally going to be where our record player sat, but alas, that was a fail too.  The record player stuck out too much for us to feel comfortable leaving it there.  Two active dogs that like to wrestle + technology in not the securest location = mess that I don't have time for.

I did have an aha! moment when I was trying to do a lots of math to take into consideration the thickness of the boards and where to start screwing in the brackets. (Hello, I am a math teacher)  Our painters tape was almost exactly the same thickness of our wood, so I used our laser lever, and placed the tape where it felt right.  I started with the middle two shelves because they were at eye level, then I did the top two, and lastly, the bottom two shelves.

Open Shelving Tips and Tricks www.thegreatgoodness.com

This is where I made the decision to lose one of the shelves because when up on the wall, the shelves just looked WAY too close together.  Seeing it up on the wall gave me insight that a paper sketch/Illustrator file could not.

I was really glad I did this because when it was time to screw in the brackets, I had a perfect guide.  No guessing or fussing over keeping things level.  We then used a scrap piece of cardboard that was perfectly straight (we checked using a level...or Taylor "eye-balled" it) to make sure our brackets were lined up perfectly too. We used 1.5" hex screws and did our very best to hit those studs. 

Open Shelving Tips and Tricks www.thegreatgoodness.com

We then had our lovely Home Depot friends cut the wood for us.  For our shelves, we used 2x10s.  We made the following cuts: 3 at 8 feet in length, 1 at 4 feet in length, and 1 at 5 feet in length.  We sanded, and use Polyshades Stain & Polyurethane in 1 Step by Minwax to keep things moving quickly.  This is the same stain we used on the desk we made.

Open Shelving Tips and Tricks www.thegreatgoodness.com

Here's where pictures get slightly sparse.  Taylor put the boards on while I was at work one day, so I didn't get many process shots.

Open Shelving Tips and Tricks www.thegreatgoodness.com

He used 2.25" hex bolts and cap nuts to secure the board to the bracket.

Open Shelving Tips and Tricks www.thegreatgoodness.com

Yikes, ignore the finger prints/dust particles.

Open Shelving Tips and Tricks www.thegreatgoodness.com

And here is one of Pedro, obviously slowing us down with all the cuteness.  Oh my gosh, I forget home small he was.

Open Shelving Tips and Tricks www.thegreatgoodness.com

When it came to styling, we used things we already had and played around a bit.  We ran back over to Home Depot (trip #231) and grabbed some plants to add some life and clean air into our living room.

I love that we have most of our books in one place, that there are small baskets for decks of cards and other knick knacks, and our television is slightly camouflaged.  Taylor was really proud of his cactus arrangement that he picked out.

Open Shelving Tips and Tricks www.thegreatgoodness.com

I think that we spent right at $100 maybe $150.  This was back in September, so I am not quite sure, but I will say that it makes a huge impact in the space.  Especially, when it started out looking like this.

Open Shelving Tips and Tricks www.thegreatgoodness.com