Baby Room: Plans

When we found out that Baby Brack was a Lady Brack, I immediately went to work creating a nursery mood board.  My first instinct was to keep it gender neutral for future babies, but I have too much fun decorating/choosing/designing/planning to leave the nursery the same for whenever baby dos happens, so feminine touches were allowed and encouraged.  

Briar Nursery-5.jpg

Crib |  Curtains  |  Glider  |  Leather Ottoman (similar) |  Lamp  |  Hamper  |  Rug  |  Pillow

The plant is just a place holder.  I think I am going to make a cactus plush plant similar to what Laura did here.

6a00d8358081ff69e201b8d1ec605c970c.jpg

The dresser pictured is from Ikea, but it doesn't exist anymore.  Instead, I found a Craigslist dresser that we sanded and painted the peach color pictured.  
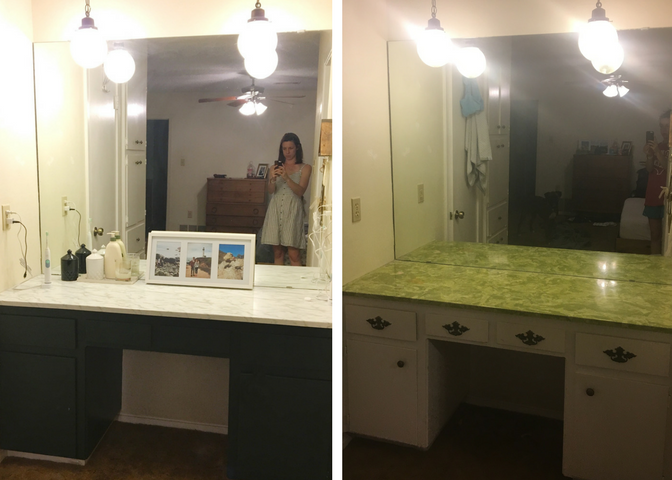
Here is the before.

2017-09-03 09.40.44.jpg
2017-09-03 09.40.35.jpg

On the list of things to do:

1. Scrape popcorn ceilings & retexture - done

2. Rip out carpet and baseboards - done

3. Lay flooring and install new baseboards - flooring done/baseboards not

4. Rip out the bifold doors and replace with this DIY (probably in mint or grey)

5. Replace fan - done

6. Paint the room bright white - done

7. Paint the baseboards

7. Make the closet function with all of the necessary shelves and rods

8. Find a solution for books/toys

I have a blank wall in which I don't know what to do with.  I like the idea of doing a woven art piece like this. 

948496526de85053a26a11fcd47ac3a1.jpg

I love this room.  I find myself sitting in there and just looking around absorbing all of the future cuteness.  The dogs are already standing at the threshold waiting for permission to come in.  They know! 

Big News!

We are having a baby!  

2017-09-14 19.19.52.jpg
2017-10-01 16.38.13.jpg
2017-11-03 20.32.26.jpg

Taylor and I are v excited.  She is due mid March.  We had a gender reveal party, and Taylor had the brilliant idea of doing a scratch off.  It was also donut themed hence the donut blow up.

2017-10-14 21.07.56-1.jpg
2017-10-15 09.29.49.jpg
2017-10-14 18.50.15.jpg

We have been spending our weekends working on the nursery which I will update ya'll soon on.  Also, I am acknowledging that I have so many house updates to share.  

House Update: Bathroom Vanity with Marble Contact Paper

We are completing small projects over here until we do our big overhaul this summer.  A couple of weekends ago, I decided that the biggest impact In our master bedroom (besides the floor, walls, and ceiling) would be to update our very dated vanity.

Don't get me wrong, I do love its funkiness.  The light fixtures are my favorite, and I hope that we can salvage them when we do a complete bathroom overhaul, but the green had to go.  And the white paint and hardware had seen better days.  Here is the before.

Look how green it is!  We opted to use contact paper like Jess did In her kitchen.  We figured that since the vanity is not exposed to water and since it is temporary,  contact paper seemed like the perfect solution.

First, I removed the caulk, so that I could get the contact paper to fold around the edges.  Then I realized that it was an impossible task to fit in the crack with the sticky side exposed, so I just did my best.  I will cover it with caulk later.

I unrolled and tried to keep everything straight while Taylor used a credit card to express any of the bubbles.

We went as slow as possible, but we still struggled to remove all bubbles.  I didn't take any photos of the second piece we needed to cover the side closest to the mirror because it was quite a disaster to do, but it worked anyway.  Not perfect but much better.

It's pretty amazing how much this looks like real marble.  I removed the hardware, filled the holes with wood filler, sanded, and painted the cabinets. Woohoo!  So much better!

Here is our before and after.  Next up: carpet, walls, and ceiling. NBD.

Untitled design.png